Get a Free Comfort Height Toilet Today
Bathroom Lighting Design – The Upgrade Homeowners Regret Skipping Most
Top 3
Most-cited bathroom remodel regret category
4 Layers
Every well-designed bathroom needs
2700–3000K
The color temperature range that works
Lifetime
Warranty on every Carolina Creek install
Ask homeowners who have finished a bathroom remodel what they wish they had done differently, and lighting is almost always in their top three answers. Reddit renovation threads name it as consistently as they name grout maintenance. Designer post-project surveys name it more than any other category except budget overruns. And unlike grout — which fails visibly over time — lighting regret is invisible: the bathroom looks fine in the daylight photos from the finished-project reveal, but the homeowner discovers year-round that shaving, makeup application, and everyday grooming happen under lighting that was never really thought through.
This guide explains why lighting gets skipped, what a properly designed bathroom lighting scheme actually includes, the four layers every well-designed bathroom needs, the color-temperature and CRI (color rendering index) numbers that matter, placement standards for each fixture type, common mistakes that produce shadowing and glare, and honest cost ranges for the whole system in the NC market.
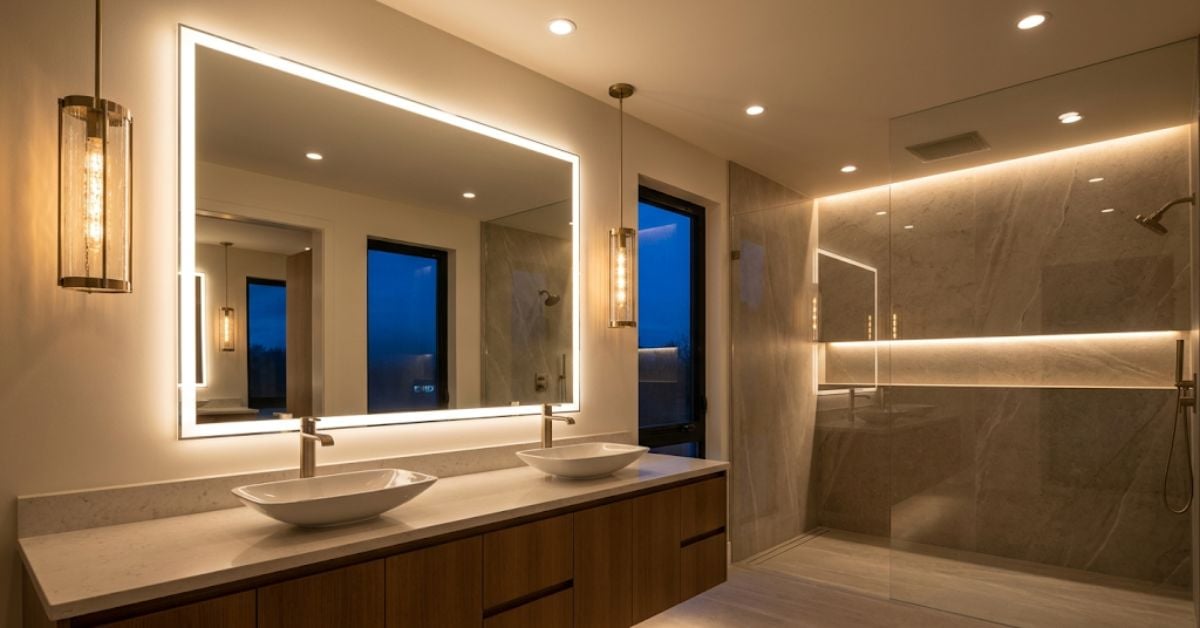
Why Lighting Is the Regret Homeowners Skip Most
Three factors combine to make lighting the most-skipped-and-most-regretted category in bathroom remodels.
First, lighting is often not part of the initial scope discussion. Homeowners come to a bathroom consultation with vivid ideas about the shower, tub, vanity, and tile — because those are the physical elements they interact with. Lighting is invisible when the bathroom is unlit, and it does not appear on Pinterest boards the way finish materials do. If the contractor does not raise it explicitly, it stays out of the scope until it is too late to design it properly.
Second, when lighting does enter the conversation, budget pressure often pushes it toward “we’ll just reuse the existing fixtures.” That is the wrong call in almost every case. The lighting in a pre-remodel bathroom was typically specified by a builder or a previous owner working within different design constraints. Keeping it in a remodeled bathroom is like putting a Ford dashboard in a Mercedes — the underlying quality mismatch is visible every day.
Third, lighting quality is easy to underestimate when the bathroom is empty. Standing in a stripped bathroom during walkthrough, the existing overhead can appear adequate. The reality of grooming, showering, and moving around in the finished space at 6 AM and again at 10 PM tells a different story — one homeowners only encounter after the project is done.
The Four Layers Every Well-Designed Bathroom Needs
Professional lighting design in a bathroom uses four distinct layers, each addressing a different function. Skipping any layer produces a bathroom that lights only one activity well and everything else poorly.
Layer 1: Task Lighting (at the Vanity Mirror)
Task lighting illuminates the face for shaving, makeup application, and detailed grooming. It must come from beside the mirror at roughly eye level, not from overhead. Overhead lighting alone creates dramatic shadows under the eyes, nose, and chin — precisely the shadows that make grooming difficult. Proper task lighting comes from wall sconces flanking a mirror, or from an LED backlit mirror whose perimeter light effectively wraps around the face from all sides.
LED backlit mirrors have become the dominant 2026 task lighting solution because they solve the placement problem in one product — the light source is already integrated into the mirror at exactly the correct position. They also serve as the ambient light source when they are dimmed low, doubling functional value.
Layer 2: Ambient Lighting (Overall Room)
Ambient lighting provides overall room illumination — the light that lets you navigate the bathroom safely without stumbling into anything. This is typically a ceiling-mounted fixture: a flush-mount, semi-flush-mount, or decorative pendant depending on ceiling height. In larger master bathrooms (over 100 square feet), two or more recessed cans or a linear fixture provides more even coverage than a single central light.
Layer 3: Accent Lighting (Inside the Shower, Highlighting Design Elements)
Accent lighting highlights specific design elements or provides light in enclosed areas. In a bathroom this most often means one or more damp-rated recessed cans inside the shower (particularly important for enclosed showers where the ambient overhead does not reach effectively), LED strip lighting inside a shower niche, or a small directional accent on a piece of art or a decorative wall element.
Layer 4: Decorative/Night Lighting
The lightest and most overlooked layer. Decorative lighting includes toe-kick lighting under a floating vanity, motion-activated nightlights along the baseboard for safe nighttime navigation, and low-lumen accent lights that stay on continuously for late-night orientation without triggering full ambient lighting. This layer is especially valuable in bathrooms serving multiple household members with different sleep schedules — the vanity toe-kick provides just enough light for the person up at 3 AM without waking anyone else.
The layered principle: Each layer should be independently switched (or on a dimmer group) so the bathroom can be lit for different activities. Bright task + ambient for grooming. Ambient only for a bath. Low ambient + accent + nightlight for evening wind-down. A bathroom with a single switch controlling one overhead fixture is a bathroom lit for one activity. A bathroom with four independent lighting layers is a bathroom that adapts to the person using it.
The Two Numbers That Matter — Color Temperature and CRI
Color Temperature (Kelvin)
Color temperature describes whether the light appears warm (yellowish) or cool (bluish). Measured in Kelvin (K), lower numbers are warmer and higher numbers are cooler. For residential bathrooms, the correct range is 2700K to 3000K — warm white that flatters skin tone and feels welcoming. Above 3500K, light starts to feel institutional or fluorescent. Below 2700K, colors become distorted and grooming becomes harder.
| Color Temperature | Character | Best For |
|---|---|---|
| 2700K | Warm white (incandescent-like) | Ambient and decorative lighting; traditional bathrooms. |
| 3000K | Soft white (slightly cleaner) | Task lighting at the vanity; contemporary bathrooms; the safest overall choice. |
| 3500K–4000K | Neutral to cool white | Not recommended for residential bathrooms — reads as institutional. |
| 5000K+ | Daylight (very cool) | Never for residential — hospital or commercial only. |
CRI (Color Rendering Index)
CRI measures how accurately a light source renders colors compared to natural sunlight, on a 0-to-100 scale. For a bathroom where accurate color matters (makeup application, matching clothes stored in adjacent closets), CRI of 90 or higher is required. Cheap LED fixtures often have CRI in the 70s or low 80s — light bright enough to see by, but colors distorted enough that mascara looks different in the bathroom than it does in daylight. Specify CRI 90+ on every fixture, especially task lighting.
Placement Standards for Each Fixture Type
Vanity Task Lighting
- LED backlit mirror: Mirror center at approximately 60 to 65 inches from finished floor. Perimeter LED provides adequate task light on its own for most residential use; add sconces or additional fixtures for very tall users or particularly detailed grooming needs.
- Wall sconces flanking mirror: Bulb center at approximately 60 to 66 inches from finished floor, sconces spaced 36 to 40 inches apart (usually one on each side of a standard vanity mirror). Height matters more than width — sconces mounted too high create the same shadows as overhead lighting.
- Horizontal vanity bar above mirror: The oldest approach and the weakest — creates severe under-eye shadows. Acceptable only when supplemented by flanking sconces or an LED backlit mirror.
Ambient Overhead
- Single fixture: Center of the room, sized to bathroom dimensions. For bathrooms up to 80 square feet, a single 18- to 24-inch flush-mount is adequate.
- Recessed cans: For bathrooms over 100 square feet or with unusual layouts. Space 4 to 6 feet apart for even coverage. Use damp-rated cans in shower zones and above tubs.
- Decorative pendant: Above a freestanding tub or as a design statement in a large room. Bottom of fixture at least 84 inches from the floor to avoid head clearance issues.
Shower and Wet-Zone Accent
- Shower recessed can: Damp-rated or wet-rated (check fixture label against local code). Centered over the shower area, typically one 4-inch or 6-inch can for a standard shower footprint.
- Niche LED strip: Low-voltage LED strip along the top or bottom of a recessed shower niche. Adds design impact and provides accent illumination inside an otherwise dark shower zone.
- Vanity toe-kick lighting: LED strip under a floating vanity. Provides both decorative uplighting and functional nighttime navigation.
Common Lighting Mistakes That Produce Regret
- Single overhead fixture as the only light source. Creates dramatic shadows for anyone standing at the mirror. Impossible to shave or apply makeup accurately.
- Cool-color-temperature bulbs (4000K+). Reads as institutional. Skin tones look wrong. The bathroom feels like a doctor’s office regardless of finish material quality.
- Low CRI bulbs (below 90). Colors are distorted. Makeup applied under low-CRI light looks wrong in daylight. The most-cited “lighting was OK but colors always looked off” regret comes from CRI compromise.
- No dimmer switches. A bathroom that is either fully lit or fully dark cannot adapt to different times of day. A dimmer on every layer is the single easiest quality-of-life upgrade.
- Skipping the shower light. Standard bathroom overhead does not reach effectively into an enclosed shower. Shampoo bottles, soap, and personal items become hard to see. Add a damp-rated can inside the shower during the electrical rough-in — much cheaper than adding it later.
- Reusing existing fixtures to save money. The lighting was specified by a builder or previous owner working within different design constraints. Keeping it in a remodeled bathroom undermines everything else the remodel achieved.
What Proper Bathroom Lighting Actually Costs
| Component | Cost Range (Materials + Install) |
|---|---|
| LED backlit mirror (task lighting) | $400–$1,200 |
| Two coordinated wall sconces (task lighting) | $350–$900 |
| Ambient overhead (flush-mount or decorative) | $250–$800 |
| Recessed cans (2–4, LED with damp-rated in wet zones) | $400–$900 |
| Shower recessed can (damp-rated) | $200–$400 |
| Vanity toe-kick LED strip | $150–$350 |
| Dimmer switches (per layer) | $60–$150 each |
| Complete 4-Layer System Total | $1,500–$4,000 |
On a Tier 2 or Tier 3 bathroom remodel running $18,000 to $34,000, the full lighting system represents 5 to 12 percent of the budget — a modest allocation for what is objectively the single most-regretted skip category. Specify it correctly during design, wire it during rough-in, and it is essentially free compared to retrofitting it later.
FAQ — Bathroom Lighting Design
What’s the single most important lighting upgrade in a bathroom remodel?
An LED backlit mirror. It solves the task lighting problem in one product, doubles as ambient lighting when dimmed, is dramatically better than any overhead alternative for grooming, and photographs as luxury design. If your budget only allows one lighting upgrade, this is it.
Do I need multiple switches for a proper lighting scheme?
Yes. Each layer of lighting should be independently switchable so the bathroom can adapt to different activities and times of day. At minimum: one switch for task lighting, one for ambient, one for shower accent, and one for decorative/nightlight if included. Dimmers on each are highly recommended.
Can I add lighting after the remodel is done?
Yes, but at 3 to 5 times the cost of doing it during the remodel. Adding a shower can or ambient recessed lighting to a finished bathroom requires opening the ceiling, running new wiring, and patching drywall. Adding wall sconces requires opening walls to route wiring. This is why the strongest recommendation for anyone doing any bathroom remodel is to design the full lighting scheme upfront and wire it during rough-in — even if you install some fixtures later.
Are LED fixtures worth it over halogen or CFL?
In 2026, yes — for almost every bathroom application. Modern LEDs offer high CRI (90+), warm color temperatures (2700K to 3000K), true dimmability, 15+ year service lives, and low energy consumption. Halogen bulbs generate too much heat for enclosed fixtures and burn out frequently. CFLs have poor color rendering and slow warm-up times that make them unsuitable for task lighting. LED is the correct choice today.
Where do I start with a bathroom lighting design?
Include lighting in every remodel consultation from the start. Carolina Creek Tub & Shower includes lighting design as part of every bathroom remodel consultation across Lake Norman luxury bathroom projects, Davidson master bath work, and every other city in our NC service area — with LED backlit mirror options, coordinated wall sconces, damp-rated shower cans, and dimmer controls specified upfront rather than after the drywall closes.
Related Master Bathroom Design Services
- Luxury Bathroom Remodeling Lake Norman — full master bathroom design including lighting across Lake Norman.
- Luxury Master Bathroom Remodeling Davidson, NC — Davidson master bathroom lighting and design.
- Luxury Master Bath Remodeling Cornelius, NC — Cornelius master bath design services.
- Master Bathroom Remodeling Huntersville, NC — Huntersville master bathroom services.
- Master Bathroom Remodeling Matthews, NC — Matthews master bathroom design.
- Luxury Bathroom Remodeling Mint Hill — Mint Hill luxury bathroom design and lighting.
Get Bathroom Lighting Designed Right From the Start
Owner-led consultations, lighting design included in every remodel scope, LED backlit mirror options, damp-rated shower accents, coordinated dimmer switches, and a lifetime warranty on every installation.